RAW Vs. JPEG | Final Words
One thing to keep in mind is that there is no such thing as an “unedited” or “unadulterated” photo.
Either your camera is doing the processing for you or you’re doing it via software elsewhere. The main difference here is how much control you want to have over the final product.
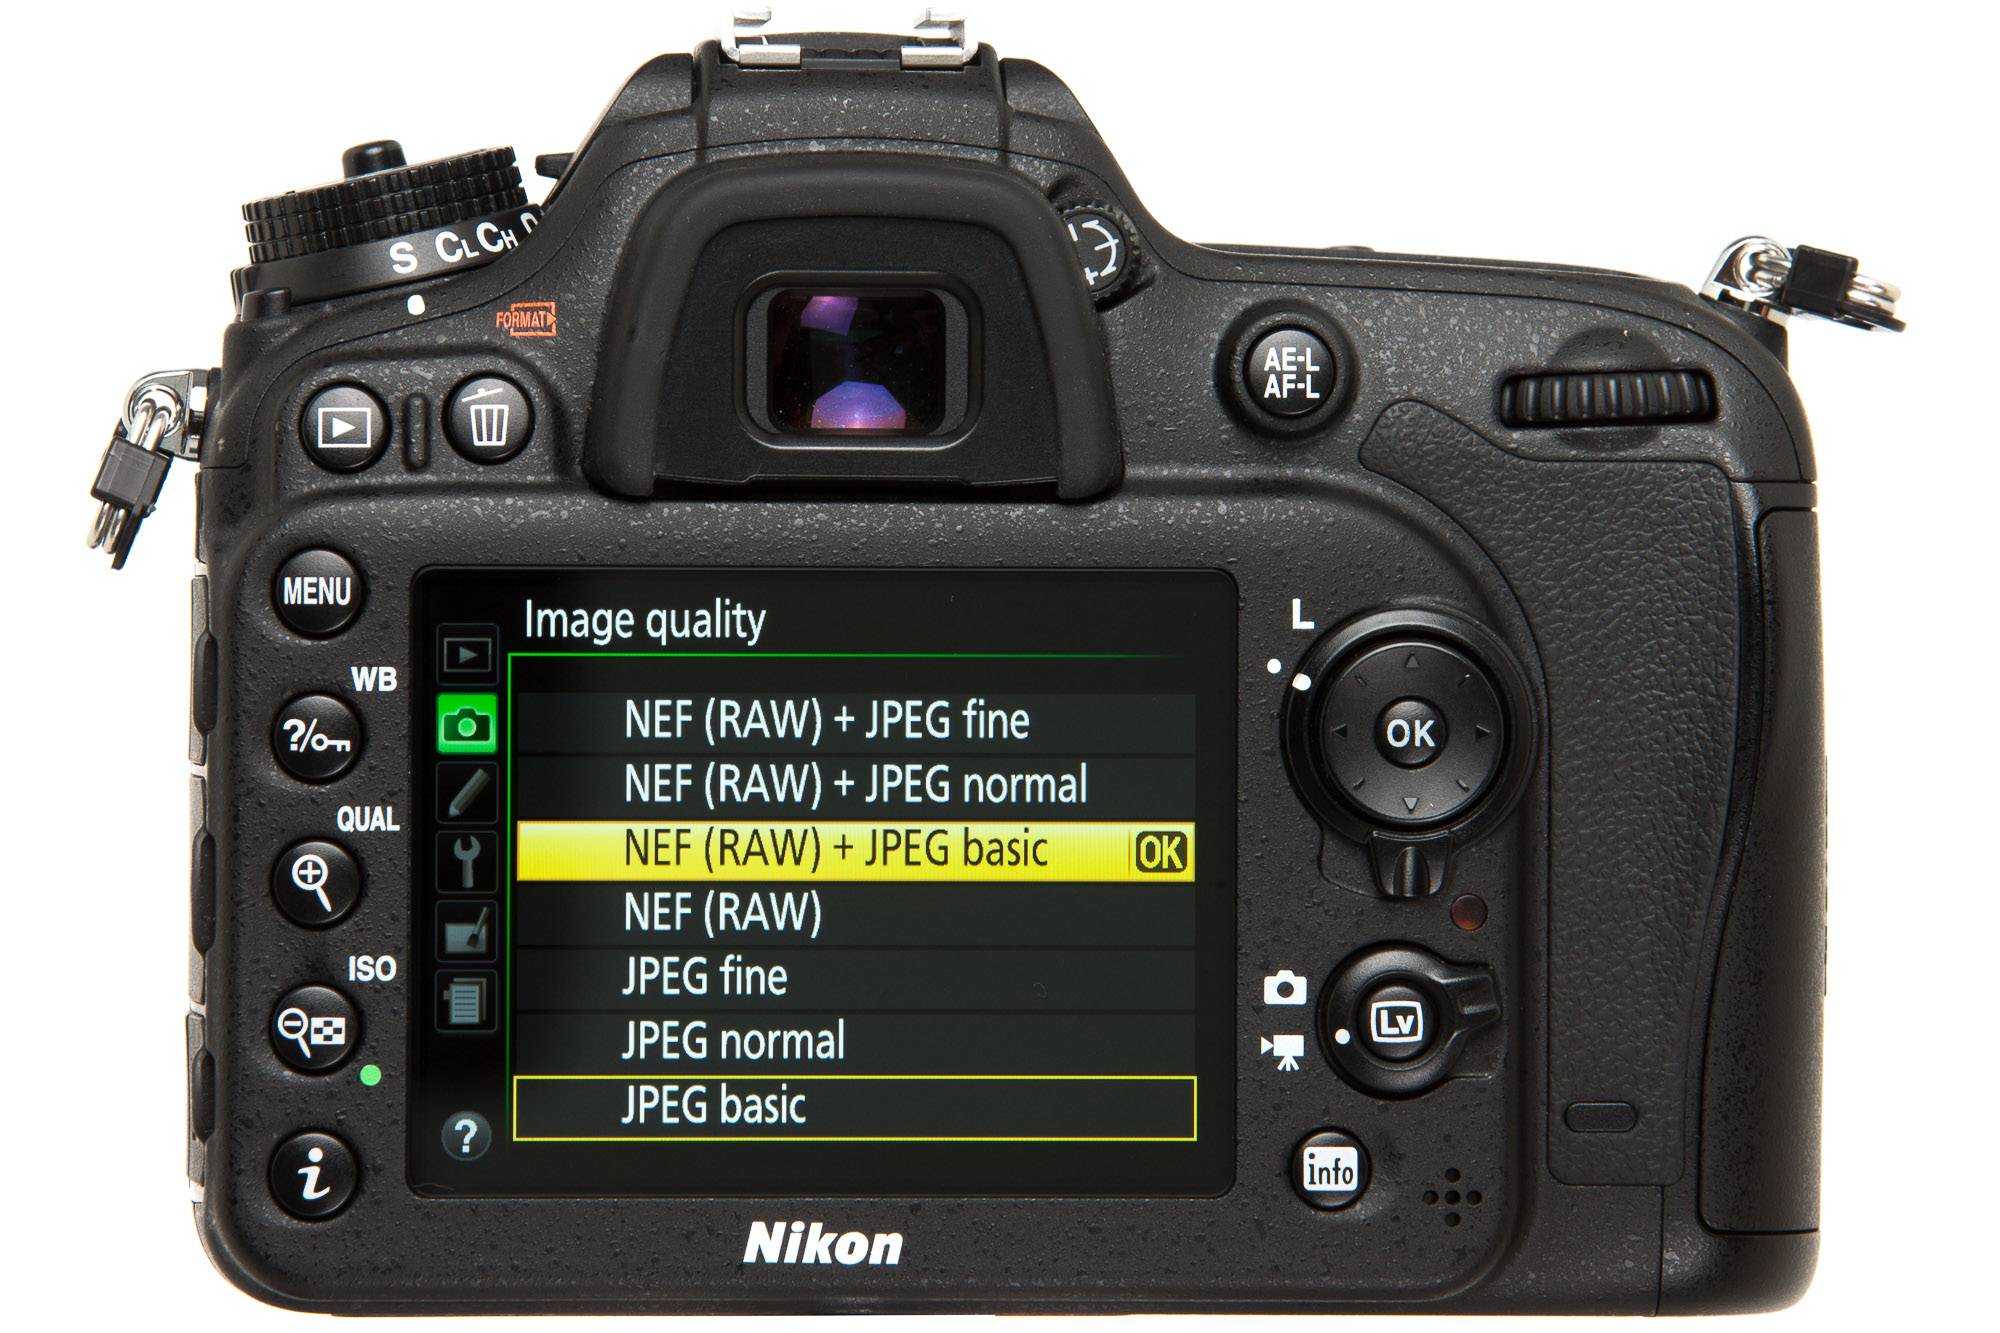
Not sure about making a change? Try setting your camera to the RAW + JPEG option so that you can capture both formats simultaneously. Then you’ll be able to experiment at will with nothing to lose.
Disclaimer: All recommendations are impartial and based on user experience, with no bias to the products or the brand. The products in this post contain affiliate links which help support Shotkit.
Highly Recommended 8 Tools for Photographers
Check out these 8 essential tools to help you succeed as a professional photographer.
Includes limited-time discounts.
Learn more here
Что такое глубина цвета?
Компьютеры (и устройства, которые управляются встроенными компьютерами, такие как цифровые SLR-камеры) используют двоичную систему исчисления. Двоичная нумерация состоит из двух цифр – 1 и 0 (в отличие от десятичной системы исчисления, включающей 10 цифр). Одна цифра в двоичной системе исчисления называется «бит» (англ. «bit», сокращенно от «binary digit», «двоичная цифра»).
Восьмибитное число в двоичной системе выглядит так: 10110001 (эквивалентно 177 в десятичной системе). Таблица ниже демонстрирует, как это работает.
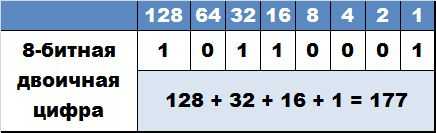
Максимально возможное восьмибитное число – это 11111111 – или 255 в десятичном варианте. Это значимая цифра для фотографов, поскольку она возникает во многих программах для обработки изображений, а также в старых дисплеях.
Почему Apple ProRAW мне так понравился
Справа – Sony A7, редакционная камера, которой уже лет шесть.
Я очень много фотографирую на iPhone. iCloud соврать не даст: больше полтерабайта изображений за 7 лет! Но в работе, и особенно для чего-то профессионального (например, продакт-шоты обзоров), предпочитаю проверенную временем «зеркалку» Sony A7.
Сколько бы ни продвигалась вперёд индустрия смартфонов, реальность не меняется. Чтобы вот так раз и всё, до конца – сколько не пробовал, не получается заменить качественную камеру с дорогим и продуманным объективом. Макро-съёмка и в целом предметная фотография требует высокой детализации, ручной постобработки, контроля над каждой мелочью.
Однако с каждым годом Apple будто всё активнее шепчет на ухо: мол, не бери эту «торпеду» с собой. Попробуй на Айфон снять. А что, вдруг получится?
И иногда правда получается. Например, iPhone 11 Pro Max очень помог в обзоре iMac 2020 года. И в обзоре iPad 2020 года. Помог бы и во многих других, если бы не одна проблема: формат фото.
Снято на iPhone 11 Pro Max, обработка минимальнейшая.
В идеальных условиях съёмки, с мягким и ярким светом в помещении, отсутствием пересвеченных областей или слишком тёмных фрагментов кадра, тот же iPhone 11 Pro Max справлялся с задачей хорошо. Но если надо было глубоко редактировать фото и буквально его «вытягивать», возникали проблемы: артефакты переходов цвета, цифровые блоки шума в тенях. Банально не хватало данных.
RAW помогает с этим справиться.
А теперь, вместе с улучшенной светосилой основной камеры iPhone 12 Pro Max и Apple ProRAW, я уже несколько статей подряд снимаю фото в обзоры в тех же условиях, что и на Sony A7 – и затем могу доработать их до состояния, которое не стыдно выложить на сайт.
It is also possible in 8-bit, but even with uncomplicated motifs it is not as nice.
You certainly don’t have to make a doctoral thesis out of every image, especially if the tonal values are relatively evenly distributed across the histogram as in the following image. Moreover, due to the original exposure in the camera, which I had shifted to the right into the highlights (Expose to the Right), I already have the best prerequisite for shifting tonal values without losses. Due to the peculiarity of linear tonal distribution, half of the total tonal range is in the highlights and bright midtones. This is what I mean by uncomplicated tonal value distribution. I overexposed this image in camera by two stops for the bright wintry look. If I want to spread the existing tonal values to the full tonal range, I have no problem at all in the 16-bit environment. Lightroom also works internally in the extremely large “Melissa RGB” color space. In Camera Raw, it’s ProPhotoRGB. Here I have extremely darkened the white area and thus used the reserves in the bright areas very well. But even with this image, differences are already noticeable when the same corrections are made on a JPEG image with 8-bit color depth, which is in the “sRGB” color space preferred by many. On the left is the JPEG, 8-bit sRGB and on the right the original Raw with the same settings. There is a noticeable coarsening in the skin tones, scarf and coat. In the histogram of the JPEG, you can see from the height of the bars that the number of tonal values in the respective areas has been reduced. Maximum quality is important for demanding motifs It becomes more difficult with
motifs with a high dynamic range
dark image motifs
images that have to be strongly corrected
images that have to be converted between very different color spaces
Here you quickly reach the limits of what is possible with 8-bit. Within Lightroom or Adobe CameraRaw, the important corrections can be made and everything is fine. But what should one do when further processing such as elaborate retouching is required? The problem is that when converting from the extremely large ProPhoto RGB and Melissa RGB color spaces to a much smaller color space, visible color shifts can occur. Shown here is a comparison of ProPhoto RGB (light gray) with sRGB.
Real-life examples
Some camera makers have other RAW formats, such as sRAW and mRAW, that actually decrease the pixel count of your images, while still giving you the flexibility of a RAW file. But, at the end of the day, one thing is clear – shooting in RAW will always give you significantly more freedom to edit your images than shooting in JPG. The question then becomes, which RAW format to use?
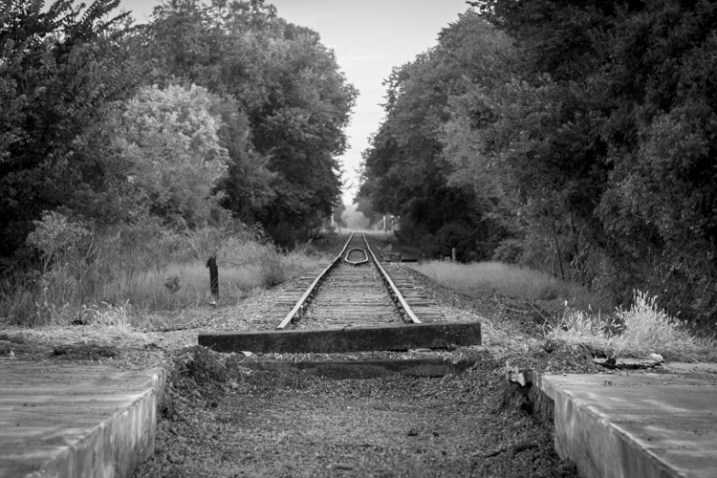
There are benefits and drawbacks to each one, but all RAW types allow you to have an extraordinary degree of flexibility in post-production, compared JPG. Like almost everything in photography, there is no single correct answer to the question, and it is largely dependent on your shooting style and needs as a photographer. To see how this plays out in a real-life scenario, here’s a picture I took, overlooking the Formal Gardens at Oklahoma State University.
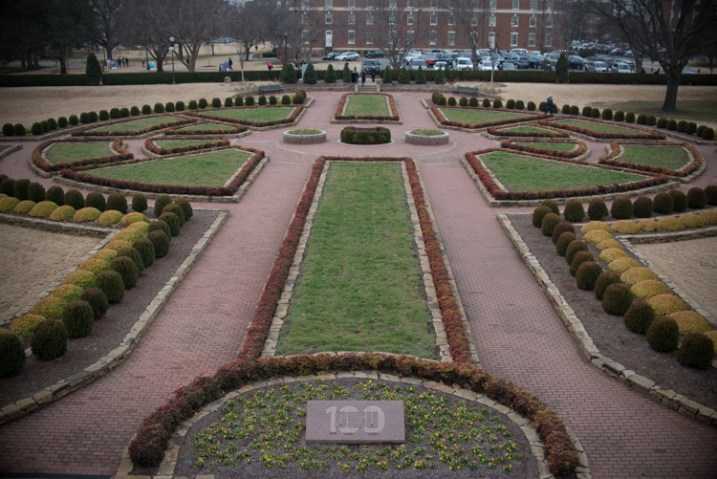
35mm, f/4, 1/350 second, ISO 100
I re-shot the same picture using massive over- and under-exposures using four different RAW formats, then corrected them in Lightroom. Shooting these photos as JPGs would have resulted in unusable images, but RAW gives you so much extra information, that you can often salvage parts of a picture that would have been entirely lost otherwise. RAW is useful for much more than fixing overexposed pictures, but it’s in extreme circumstances like this that the real differences between the 12-bit, 14-bit, compressed, and uncompressed formats, would be most likely to show up.
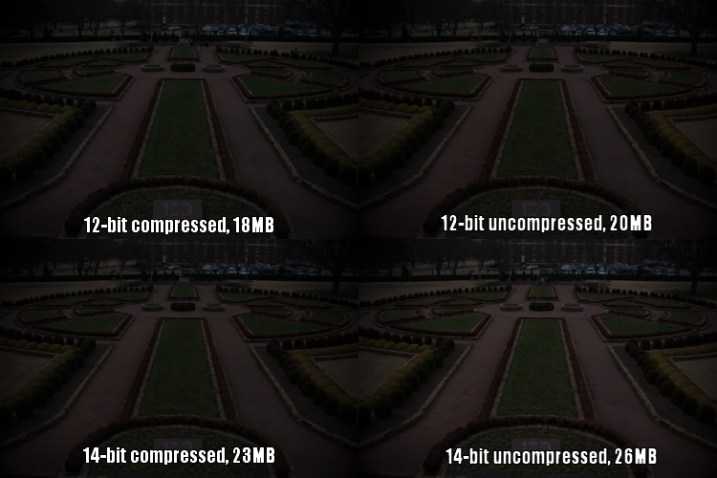
This first set of images has been intentionally overexposed by three stops, by leaving the aperture at f/4 and ISO at 100, but increasing the shutter speed to 1/30 second.
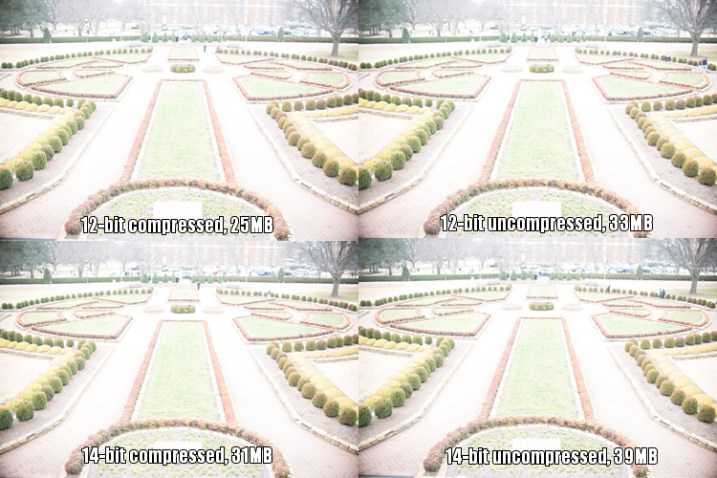
Overexposed intentionally by three stops, to test which format offers the most in terms of highlight recovery.
I then used Lightroom to bring the exposure values back down by three stops, for a correctly exposed image. Some data has been lost due to clipping, where things are so overexposed there is literally nothing left to recover, but for each picture I was able to get a decent image, useful for comparison purposes. I still wouldn’t use these in an actual production environment, but it does give you an idea of how flexible the RAW format really is.
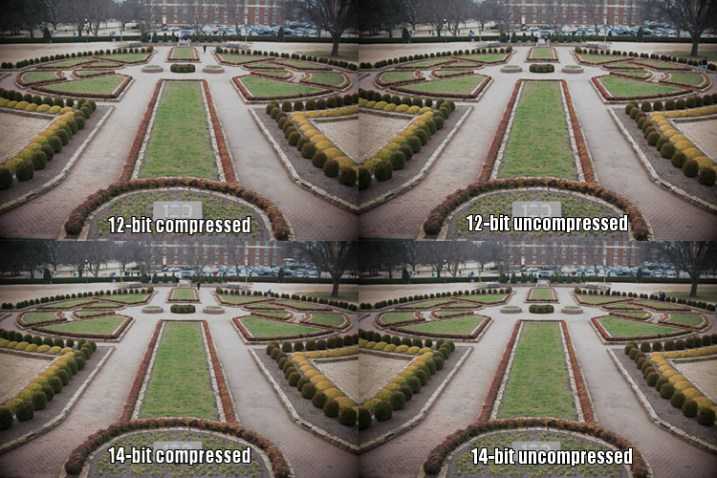
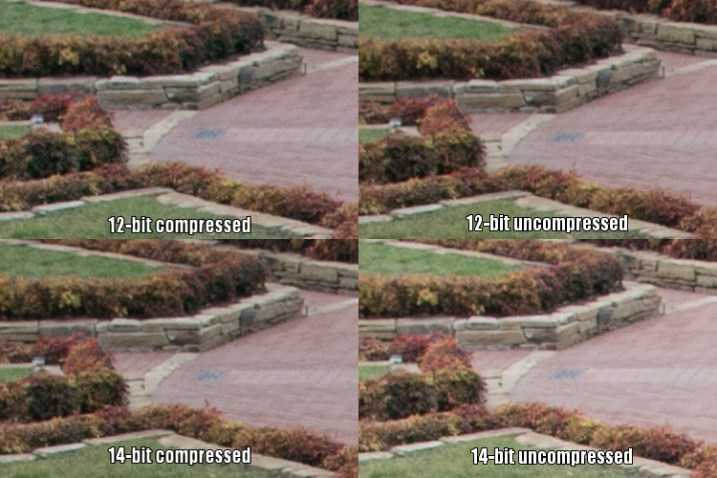
All images look virtually identical, but that’s not too unexpected given that these are minuscule thumbnails of 24-megapixel images. To get a better understanding of how the RAW compression formats compare, here is a 1:1 crop of the same section of each photo.
Upon close inspection, all four RAW formats appear to offer similar functionality when recovering highlight data.
Notice much of a difference? I don’t. That’s not to say there isn’t any difference, just not one that’s discernible to the human eye.

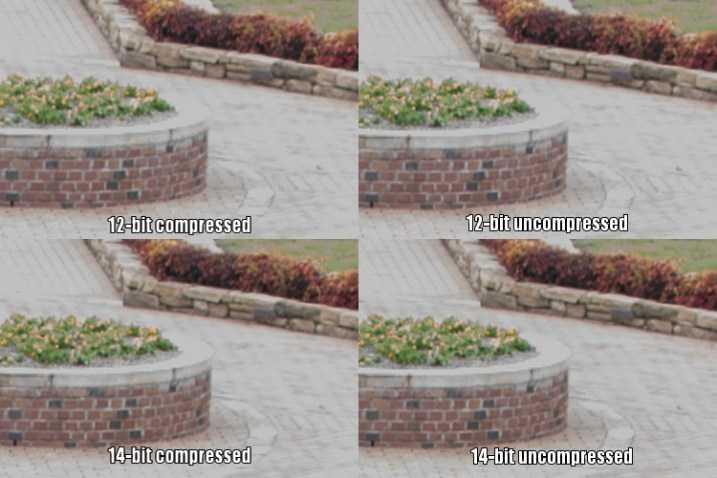
Since the initial 14-bit uncompressed file is more than 50% bigger than a 12-bit compressed image (39MB versus 25MB) there is clearly a lot more data to work with, but as this test illustrates much of that is not likely to matter a whole lot in practical terms. The biggest difference I can see is not due to lossy compression but bit rate, as both 14-bit files show just a few more clearly-defined bricks in the sidewalk, to the right of the planter.
However, keep in mind this is a 1:1 crop of a 24-megapixel image. You’re looking at about 94,000 pixels in each section above, out of nearly 25 million, or about .04% of the total image. If you have to zoom in this far to see any noticeable differences between 12-bit and 14-bit RAW files, that were overexposed by three whole stops to begin with, then to me it does not offer a significantly compelling reason to shoot 14-bit RAW most of the time.
To continue with the comparison, here’s the same picture underexposed by three stops in camera, by increasing the shutter speed to 1/3000 second.
Underexposed by three stops to test shadow recovery.
Since almost no data was clipped, which I could tell by looking at the histogram, adjusting the exposure by three stops in Lightroom results in an image that is virtually identical to the correct one at the top of this article. Taking another look at the 1:1 crops below, yields a similar result as the first test.
Once again, all four RAW formats appear to be on par with each other for recovering detail in the shadows.
The results here are remarkably similar to the overexposure test, and remember that these pictures have been severely underexposed before correcting them in post. The differences between the corrected images you see above are negligible, and the much smaller 12-bit compressed file gives results that are almost identical to the 14-bt uncompressed.
Объяснение битовой глубины — что на самом деле означают 8Bit, 10Bit и 12Bit
Битовая глубина — это то, о чем мы часто слышим. Когда был анонсирован Panasonic GH5 с возможностью снимать 10-битное видео, многие люди сошли с ума. Как и ожидалось, Blackmagic Pocket Cinema Camera 4K поддерживает формат 12Bit RAW CinemaDNG.
Но что это? И что это означает в реальном выражении для ваших видеоматериалов или изображений? Что ж, ребята с канала Videomaker на YouTube поддержат вас, и они здесь, чтобы объяснить это в этом 3-минутном видео.
Рекламные объявления
По существу, это сводится к количеству цветов и оттенков цвета, которые могут быть сохранены в изображении. Битовая глубина указывается в двоичных цифрах (битах) и относится к тому, сколько различных уровней яркости доступно в каждом из трех каналов красного, зеленого и синего цветов.
Таким образом, в 8-битном изображении каждый из каналов красного, зеленого и синего цветов имеет 256 возможных значений, что в сумме дает около 16,7 миллионов цветов. Человеческое зрение может различать около 10 миллионов цветов, разве этого недостаточно? Что ж, хотя человеческий глаз может видеть около 10 миллионов цветов, это не обязательно те же 10 миллионов цветов, что и в 8-битном файле.
Между ними есть тонкие оттенки и цвета, которые замечает наш глаз, но которые 8-битные изображения просто не могут воспроизвести. Вот почему мы часто видим полосы в градиентах, таких как небо. Увеличение разрядности с 8 до 10 бит увеличивает размер файла только примерно на 20%, но увеличивает цветовой диапазон из 16,7 миллионов до более чем миллиарда. А когда вы переходите на 12-битное видео, это 68 миллиардов возможных цветов, которые камера может записать в вашей работе.
Другим преимуществом большей разрядности является то, что она дает вам больше свободы при публикации. И я говорю не только о «исправлении» кадров (хотя это поможет). Я говорю только о простой цветокоррекции.
Advertisements
Если вы загрузите 8-битное изображение в Photoshop и начнете добавлять корректирующие слои, оно очень быстро сломается. А когда вы снова сожмете его и сохраните обратно в формате jpg, он потеряет еще больше данных. Если вы начинаете с 10-битного или 12-битного файла, это означает, что он не будет так быстро ухудшаться, пока вы его редактируете, а алгоритмы сжатия имеют больше исходной информации для работы при сохранении.
Хотя приведенное выше видео больше ориентировано на видео, то же самое относится и к фотографиям. Вот почему мы наблюдаем переход от 10-битных файлов RAW к 12-битным, а 14-битные теперь являются стандартом для большинства цифровых зеркальных и беззеркальных камер среднего и высокого класса.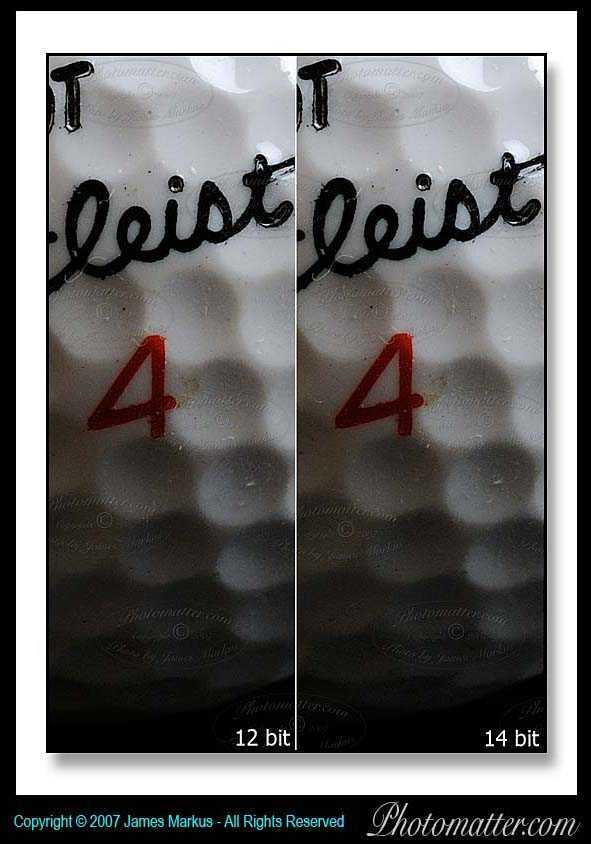
12 бит: Сервер статистики. Авторизация.
So, which format should you use?
While you can’t draw a universal conclusion from just one test, this example does illustrate that shooting in 12-bit compressed RAW still gives you plenty of data to work with, when editing your images. As I mentioned at the top of the article, some data is literally thrown away when shooting with a lossy compression format, but in most situations it’s nothing you are likely to notice. Only in extreme circumstances, such as when you want to do massive highlight or shadow recovery, or if a photo has been severely over or under-exposed, are you likely to notice any practical benefits from shooting in 14-bit RAW.
However, if you are the type of photographer who wants the most possible data in each picture, and continually pushes your camera to its limits, I would recommend capturing as much information as possible (i.e. shooting in 14-bit) and retaining every last chunk of it (shooting uncompressed).

Even when shooting for clients I use 12-bit RAW because it gives me more than enough color information to edit my shots. I could use 14-bit RAW, but for my purposes I have found that I simply don’t need to.
A notable caveat here is that the test I performed was just one example, and it’s entirely possible that a different scenario would have done a better job at illustrating the differences in terms of the different RAW formats. When doing this I tried to pick something that was generally representative of a typical photographic scenario, and not a situation that was far outside the realm of what most people would encounter when taking pictures. If I had over or under-exposed by four or five stops, or shot at higher ISO values, perhaps there would be some significant differences in terms of what each format has to offer, and I don’t want to draw any large-scale conclusions from just one small set of data.
What this test does illustrate is that even though 12-bit compressed RAW contains less photographic information than its higher bit rate counterparts, enough important data remains to give you plenty of wiggle room, if you need to do extreme corrections in post-production.

The original uncorrected version of the image at the top of this article, shot in 12-bit compressed RAW.
I generally don’t like to give advice when it comes to photography, life, jobs, or matters of the opposite sex, but I have shot with many types of RAW formats for a few years, and feel entirely comfortable shooting in 12-bit compressed. I do all my pictures this way, even paid jobs for clients, and have never had a circumstance in which a bad picture would have been salvageable if I had only shot in 14-bit uncompressed.
In my experience (which, I admit, is not the same as a professional photographer who makes his or her living taking pictures) there are plenty of other factors that matter just as much, such as: choosing the right lens, nailing your focus, composing your shot, knowing when and how to use external lights, and a host of other things that are more important than eating up your memory cards with 14-bit uncompressed RAW files. If your pictures regularly, and consistently, require the type of extreme editing that can only be saved by heavily editing a 14-bit uncompressed RAW file, I’m going to go out on a limb and say there are probably other things that you need to work on to improve your photography, besides choosing the right file format.
Even black and white photography can benefit from using the RAW format due to the additional data available in each individual pixel.
Of course it should be noted that the RAW format is beneficial, not just for fixing images that are way too bright or dark. RAW files give you significant flexibility when editing the colors of an image, and allow you to bring out more natural skin tones, get the deep rich blues hidden in a dull gray sky, find the intricate details of a flower petal that would be lost in a JPG, and perform all sorts of other edits that have nothing to do with making a dark photo a little brighter. Any RAW format is better than none, if you’re the kind of person who likes to edit your images after you take them, but if you want a nice balance between having lots of data while still keeping file sizes down, 12-bit compressed will most likely suffice just fine.
What about you? I’m curious what your experiences have been with compressed and uncompressed RAW. Perhaps you’re the kind of photographer who shoots in JPG and doesn’t bother messing with processing afer the fact. I’d like to hear about your experiences in the comments below, especially if you have found times when shooting 14-bit uncompressed RAW has come in handy. The more information we have to work with, the better informed we will all be as photographers.
Windows 10: загрузите расширение RAW Images
Чтобы установить и использовать расширение RAW Image Extension, вы должны использовать Windows 10 May 2019 Update (версия 1903 или более поздняя). Если вы не можете установить расширение, вам придется установить обновление из приложения «Настройки» или загрузите его вручную с веб-сайта Microsoft.
Кодек для этого бесплатного расширения предоставлен вам людьми на libraw.org и еще не поддерживает все форматы изображений RAW. Чтобы узнать, совместим ли ваш с этим расширением, посетите веб-сайт проекта для Актуальный список поддерживаемых камер. Расширение RAW Image Extension позволяет просматривать изображения в приложении «Фото», а также эскизы, превью и метаданные изображений RAW в проводнике. Вы можете открыть окно свойств RAW-файла, чтобы увидеть метаданные.
Перейдите в Microsoft Store и найдите «Расширение для необработанных изображений» или перейдите прямо в Страница расширения необработанного изображения. Нажмите «Получить», чтобы установить его.
Теперь нажмите «Установить», чтобы установить расширение.

После загрузки и установки расширения закройте Магазин и перейдите в папку с вашими изображениями RAW. Миниатюры мгновенно создаются в проводнике без использования внешней программы просмотра.
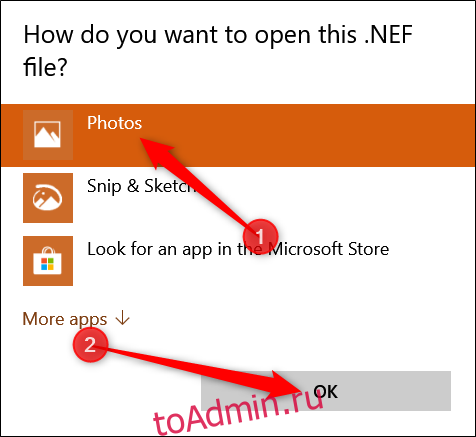
Дважды щелкните изображение, нажмите «Фотографии», затем нажмите «ОК».
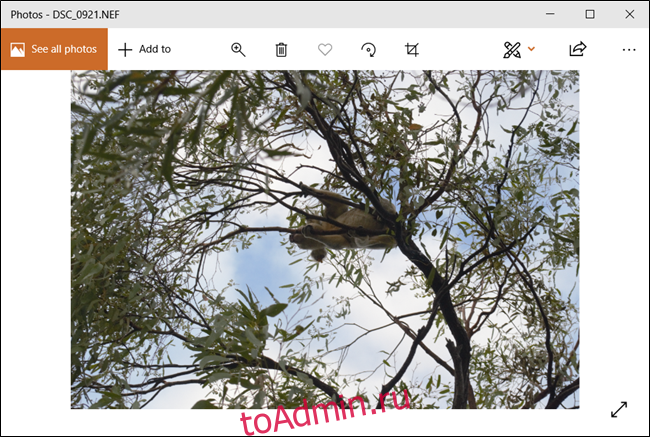
Теперь ваше изображение RAW будет открываться непосредственно в приложении «Фото» без необходимости загружать и устанавливать стороннее приложение, такое как Photoshop.
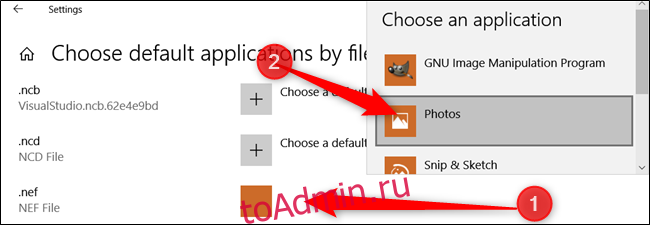
Чтобы всегда использовать приложение «Фотографии» с файлами RAW, которые вы используете, вы можете изменить программу по умолчанию для определенного типа файла с помощью нашего руководства.
Как исправить файловую систему RAW на флешке: предварительные действия
В случае возникновения ошибок записать или считать информацию с накопителя невозможно, хотя сама флешка может быть видна и в «Проводнике», и в разделе управления дисками, и в «Диспетчере устройств».
Прежде чем приступать к решению вопроса о том, как исправить файловую систему RAW на флешке, рекомендуется сначала проверить ее штатным инструментом системы в виде средства проверки дисков CHKDSK.
Для старта диагностики запускается командная консоль (cmd в меню «Выполнить»), после чего в ней прописывается строка chkdsk F: /f, в которой первая литера («F») является буквой USB-накопителя (ее можно увидеть в «Проводнике»). Эта команда хороша тем, что по окончании проверки, если сбои на устройстве не были критичными, можно будет увидеть свою флешку в стандартном формате NTFS.
Также проверку можно запустить при загрузке с восстановительного диска, используя ту же командную консоль, в которой до ввода вышеуказанной команды нужно прописать строки diskpart, disk volume (чтобы узнать литеру устройства) и exit, а затем воспользоваться стандартным средством.
Однако в случае серьезных повреждений система может выдать сообщение о том, что применение этого инструмента недопустимо для дисков RAW. Как исправить файловую систему RAW на флешке в этом случае? Самый простой выход – форматирование.
Always do the profile conversion in 16-bit
As a general rule, profile conversions should always be done in 16-bit depth, since the tonal reserves in the image compensate for tonal breaks and losses in color. In Photoshop, after your edits, you can finally convert the image to the output profile under visual control. To do this, select the command “Convert to Profile…” from the menu “Edit«. First select the target profile above. The “module”, the color calculator, is responsible for the calculation operation itself. Adobe ACE (Adobe Color Engine) is always a good choice, since it is available across platforms. With “Priority“, the selection of the rendering intent, you can now make the best choice for the image in question. Here you have to rely on your hopefully good quality and calibrated monitor. Pay attention to this. If your “Relative colorimetric“, you have to check the box at “Depth Compensation“must be set so that the black point is included in the conversion. For “Perceptive“the setting does not apply anyway. If you preserve the tonal richness of your raw files in this way until the final profile conversion for output to a fine art print or to a high quality offset print, you should not find any tonal breaks or steps in smooth gradients and you should have achieved the best possible colors. All images and text shown here are copyright of the author. These movies might also interest you: Item ID : 00231412 / Last modified : 21/11/2022 IMPORTANT: This item is only applicable to certain products. Please check the applicable products at the top of this article. RAW images captured with the following models have a resolution of 14 bits per pixel. However, the resolution is limited to 12 bits under certain shooting conditions.
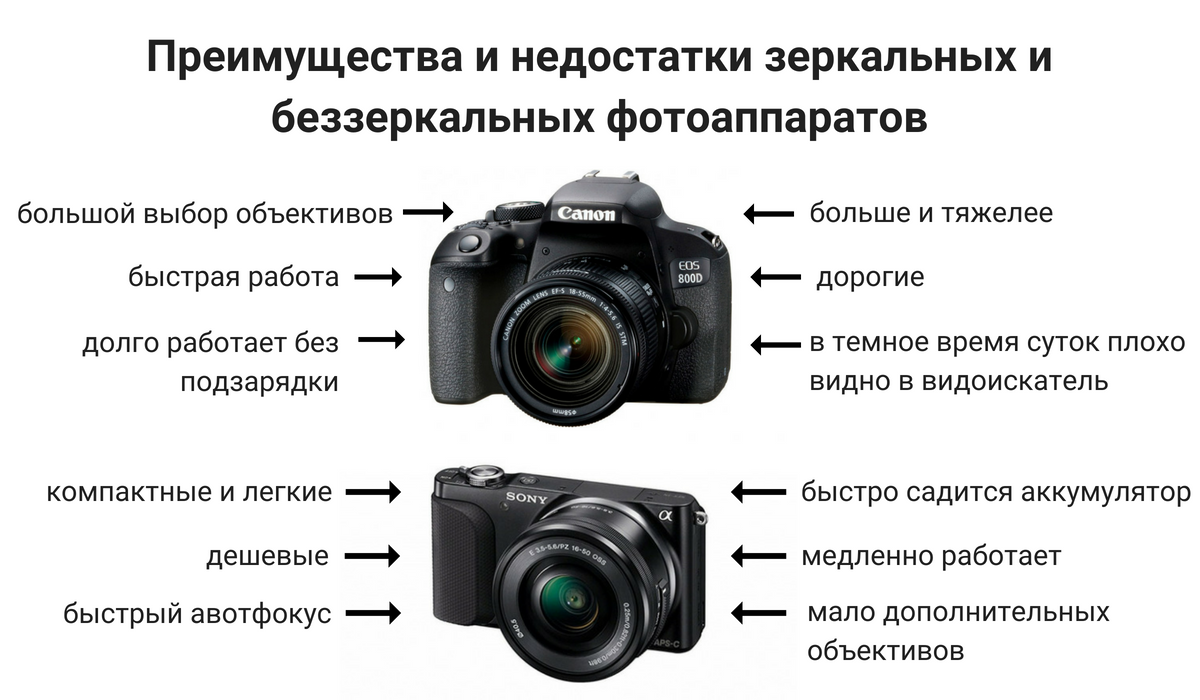
Недостатки
- RAW-файлы намного больше, чем аналогичные файлы формата JPEG, и потому быстрее заполняют карту памяти.
- Обработка RAW-файлов занимает больше времени, поскольку они могут потребовать ручной работы на каждом этапе преобразования.
- RAW-файлы часто дольше пишутся на карту памяти, что приводит к меньшему количеству кадров в секунду, чем при использовании формата JPEG.
- RAW-файлы не могут быть незамедлительно предъявлены зрителям и заказчикам, поскольку они требуют специальных программ для своей загрузки, а следовательно их сперва необходимо преобразовать в JPEG.
- RAW-файлы требуют более мощного компьютера с большим количеством оперативной памяти (RAM).
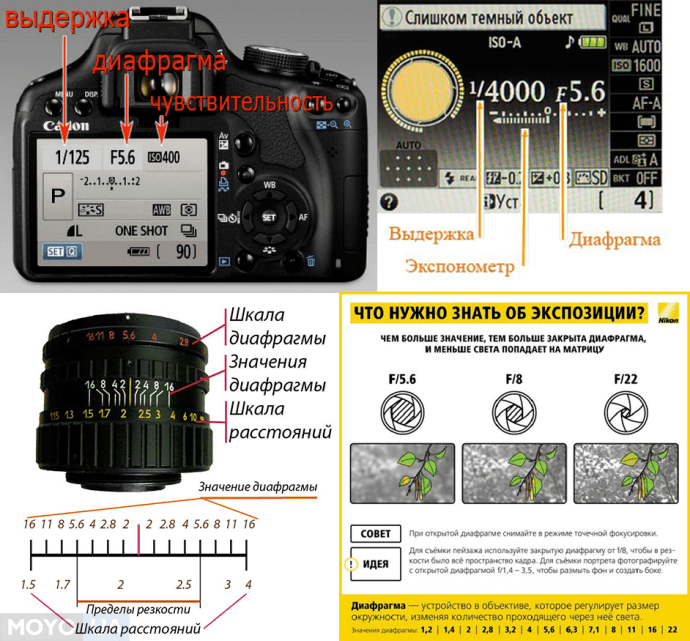
Немного теории
Фотокамеры формируют RGB изображение, где
R – Красная составляющая цвета;G – Зелёная составляющая цвета;B – Синяя составляющая цвета.
Каждая из составляющих цвета нередко именуется каналом. Говорят о канале красного, канале зелёного и канале синего цвета. Сочетания RGB составляющих позволяют отобразить всё многообразие цветов.
На Рис.1. представлены сочетания каналов, дающие цвета в чистом виде. Значение интенсивности в каналах либо 0, либо 255.
Рис.1. Различные сочетания каналов
Каждый из каналов содержит данные определённой разрядности. Цветные изображения формата JPEG имеют по 8 двоичных разрядов или бит на каждый канал. Соответственно можно говорить о 8-разрядном цвете.
В двоичном счислении в 8 битах (каждый из которых может принимать значения либо 0, либо 1) можно закодировать 28=256 значений интенсивности в диапазоне от 0 до 255 с шагом 1.
Один пиксель изображения состоит из трёх каналов RGB. Соответственно один пиксель изображения кодируется 3 (канала)х8 (бит)=24 битами.
Итак. Один пиксель RGB-изображения в формате JPEG кодируется 24 битами. Другими словами три канала, объединённые в одном пикселе позволяют создать громадное количество цветов.
Расчёт прост: 224=16 777 216, т.е. 24 битами можно закодировать больше 16 млн. различных цветов и оттенков.
Размерность глубины цвета – «бит на пиксель» или английское сокращение (bpp).
Сколько цветов и оттенков различает человеческий глаз?
Считается, что человеческий глаз способен различать порядка 7-10 миллионов цветов и оттенков. Что касается ахроматической гаммы, то человеческий глаз способен дифференцировать около 500 оттенков серого цвета.
Однако не следует абсолютизировать приведённые величины. Большую роль в восприятии цвета играет зрительный опыт и тренировка
Кроме того, важно не столько видеть, сколько уметь замечать и правильно описывать увиденное
Многие люди, начинающие работать с изображениями, просто не знают «на что смотреть». Поэтому при съёмке и обработке фотографий могут допускать ошибки, особенно первое время.
Вернёмся к разрядности цифровой фотографии. Исходя из количества цветов и оттенков, которые может различить человеческий глаз и, сопоставив с количеством цветов и оттенков, которые можно закодировать в 24 bpp, можно сделать вывод о том, что 24 bpp вполне достаточно для воспроизведения так называемого «полного цвета».
Если изображение предназначено только для просмотра, то смысла повышать разрядность изображения (создавать избыточность) свыше 24 bpp нет.
Теория
Мы уже говорили о том, что применение обычного сжатия, а также снижение разрядности с 14 до 12 бит позволяет уменьшить размер RAW-файлов ценой безвозвратной потери некоторого количества данных. О каких данных идёт речь? Речь идёт о количестве уровней яркости, т.е. дискретных значений, описывающих тональный диапазон снимка.
14 бит позволяют сохранить 16384 (214) дискретных значения для каждого пикселя, а 12 бит – 4096 (212) значений, т.е. понижение разрядности на 2 бита влечёт за собой четырёхкратное уменьшение количества уровней квантования, причём, это уменьшение происходит пропорционально во всех ступенях или зонах динамического диапазона. Это означает, что и в 14-битном, и 12-битном RAW-файлах самая верхняя ступень экспозиции будет описываться половиной от числа всех доступных значений, вторая сверху ступень – ¼ значений, следующая – 1/8 значений и т.д., но поскольку общее число значений для 14-битного и для 12-битного файла различается вчетверо, то и число значений, приходящихся на каждую зону экспозиции, также будет различаться в четыре раза.
При использовании обычного сжатия большая часть данных тоже теряется. Как и в случае со снижением разрядности на 2 бита общее количество дискретных значений уменьшается вчетверо, но происходит это неравномерно. Тени и нижне-средние тона остаются без изменений, в то время как число уровней в светлых зонах уменьшается, причём степень редукции нелинейно возрастает по мере приближения к верхней границе тонального диапазона.
Для наглядности прибегнем к таблице. Строки таблицы представляют собой зоны экспозиции. Самую верхнюю ступень для большинства цифровых камер я условно принимаю за зону VIII (это не совсем точно, но мне так удобнее). Соответственно, зона V, т.е. нейтрально серый тон начинается на три ступени ниже порога насыщения. Всего в таблице 15 зон, что немного превышает эффективный динамический диапазон D7200, который, согласно данным DxOMark, составляет 14,6 EV. Разумеется, полезный динамический диапазон камеры значительно меньше и достигает в лучшем случае 11 ступеней (грубо говоря, ниже зоны –II нет практически ничего, кроме шума), но сейчас это не имеет большого значения.
| Зоны экспозиции |
14 бит, сжатие без потерь | 14 бит, обычное сжатие | 12 бит, сжатие без потерь | 12 бит, обычное сжатие |
| VIII | 8 192 | 939 | 2 048 | 235 |
| VII | 4 096 | 709 | 1 024 | 177 |
| VI | 2 048 | 624 | 512 | 156 |
| V | 1 024 | 800 | 256 | 200 |
| IV | 512 | 512 | 128 | 128 |
| III | 256 | 256 | 64 | 64 |
| II | 128 | 128 | 32 | 32 |
| I | 64 | 64 | 16 | 16 |
| 32 | 32 | 8 | 8 | |
| –I | 16 | 16 | 4 | 4 |
| –II | 8 | 8 | 2 | 2 |
| –III | 4 | 4 | 1 | 1 |
| –IV | 2 | 2 | 1 | 1 |
| –V | 1 | 1 | — | — |
| –VI | 1 | 1 | — | — |
| Всего значений | 16 384 | 4 096 | 4 096 | 1 024 |
Наиболее интересны две колонки: «14 бит, обычное сжатие» и «12 бит, сжатие без потерь». И там и там количество дискретных значений одинаково и составляет 4096, но распределены они по-разному. Если в первом случае редукции подверглись лишь верхние зоны (начиная с пятой), то во втором случае пострадали все зоны, в том числе и нижние.
Мне больше нравится первый подход, и вот почему: во-первых, даже после сжатия верхние зоны содержат избыточное количество уровней, и их не жалко, в то время как в тенях всегда наблюдается дефицит значений, усугублять который крайне нежелательно; во-вторых, при конвертации RAW-файла к нему всегда автоматически применяется гамма-кривая, сжимающая светлые тона и растягивающая тёмные, что делает шум и артефакты в тенях ещё более заметными; в-третьих, осветлять тени мне приходится значительно чаще и сильнее, нежели притемнять света.
Внимательный читатель мог заметить, что никоновский алгоритм компрессии очень деликатно обходится с зоной V – в ней остаётся больше значений, чем в зонах VI и даже VII. Рискну предположить, что это сделано в расчёте на более-менее стандартное редактирование. В самом деле, пятая зона – это обычно средний тон, на который ложится тяжесть изрядной части манипуляций. Например, контраст большинства фотографий приходится в той или иной степени повышать с помощью , которая растягивает именно средние тона, сжимая при этом света и тени.
Как бы то ни было, проведённые мною опыты (я публикую здесь только один из них, как наиболее типичный) показали, что использование обычного сжатия при съёмке в NEF не влияет на качество изображения сколько-нибудь заметным образом даже при чрезмерно агрессивном редактировании.
В интернете хватает заявлений о том, что сжатие с потерями может привести к постеризации в светах, но мне не доводилось видеть ни одного убедительного примера.
Correct settings when passing to Photoshop
Here, the handoff to Photoshop is crucial to maintaining the best possible quality. We cannot select a rendering intent, the best conversion method, when handing over or exporting to other file formats and color spaces. So we are already missing a very important step. Therefore, to preserve all the image information, it is important that you set Lightroom and Camera Raw so that the image ends up in Photoshop in 16-bit and ProPhoto RGB color space. In Lightroom, you make the settings for the transfer to Photoshop as follows:


In the menu “Lightroom” (Mac) or “Edit” (Win) select the menu item “Preferences” go to
Click on the tab “External editing click
At “Color Space” select the color space “ProPhoto RGB” and at “Bit Depth” select “16-Bit/Component”. select.
In Camera Raw you set the transfer in the workflow options. To do this, simply click on the blue link at the bottom of the CameraRaw module.
Normalizing for the brightness and saturation
The camera specifications suggest that sNEF files are encoded in 12 bits. Normally it means that the maximum in the luma channel is 2^12-1=4095. Insufficient brightness of the image, which nevertheless contains fully blown out areas, suggests otherwise: full 12 bits are not used for luma channel. Hence we need to find what the actual maximum is.
For this matter we shot several fully blown-out frames and studied them in RawDigger. Indeed that maximum value in the luma channel does not reach 4095 and is also dependent on the white balance setting in the camera. The lowest maximum value of 2392 was obtained when the camera white balance was set to 2500K, while the highest, 2549, corresponds to while balance setting of 10000K. This way we can say that the luma data is coded with log2(2549) ≈ 11.32, or in other words the coding uses slightly more than 11 bits instead of full 12.
Normalizing the luma channel Y to 2549, we can see the brightness much closer to the reality:

Figure 3
Now after we iterated the brightness, let’s try to figure out the saturation. For now it is low. Most of the cases the saturation is low when the range in chroma channels is smaller than the coding allows. Once again, we need to normalize the chroma values through defining the maximums. We find some reassurance to the idea that the chroma range is narrower than 0..4095, because we have already established that it is the case for luma.
To find the maximums we will use red and blue color separation Lee filters to shoot a color target (X-Rite ColorChecker Digital SG), which spans approximately through Adobe RGB gamut, varying exposure to achieve maximums for chroma channels.
Resulting images suggest that the chroma channels range is very slightly wider than 2048±1024, which, by the way, also closely corresponds to 11 bits.
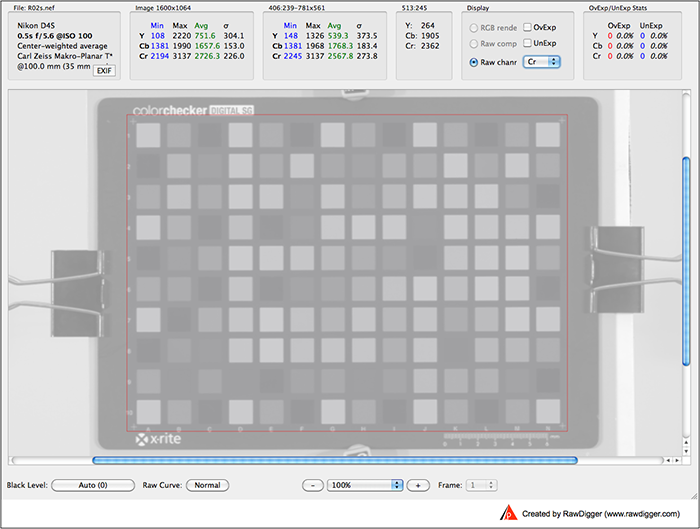
Figure 4. Shot through 25 Tricolour Red, Cr channel

Figure 5: Shot through 47B Tricolour Blue, Cb channel
Now, normalizing the chroma channels to 1024, here is what we have:
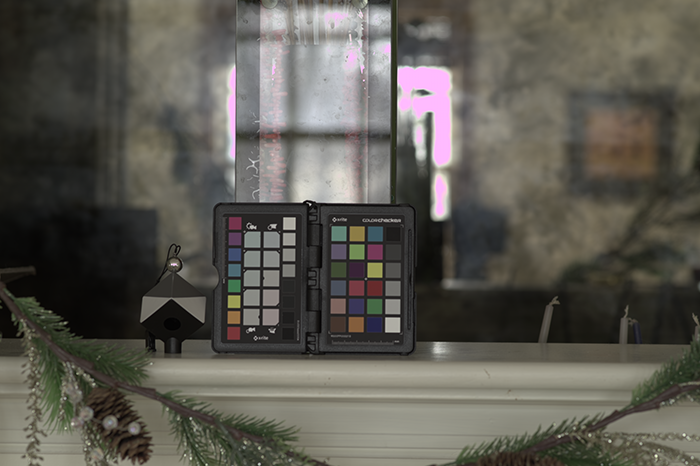
Figure 6
As we can see the saturation is improved. If you want to exclude the slightest possibility of color clipping your image converter may use the range of 2048±1280 for chroma channels (please see scYCC-nl). That will cause a slight drop in saturation, but it can be easily compensated and one of the accurate ways of doing it is by using a color profile.
ILCE-7M4 / ILCE-7RM5
-
Shutter type: Mechanical shutter
Single shot *1 Continuous shooting *2 Shooting with long time exposure Noise reduction for long time exposure is enabled *3 Compressed RAW 14 bit 12 bit 14 bit 14 bit Lossless compressed RAW 14 bit 14 bit 14 bit 14 bit Uncompressed RAW 14 bit 14 bit 14 bit 14 bit -
Shutter type: Electronic shutter or Silent mode: On
Single shot *1 Continuous shooting *2 Compressed RAW 14 bit 12 bit Lossless compressed RAW 14 bit 14 bit Uncompressed RAW 14 bit 14 bit
- *1 Single shot, described above, includes self-timer and interval shooting.
- *2 Continuous shooting, described above, includes multiple continuous shots in excellent auto mode, continuous shots in self-timer mode, and bracketing.
- *3 Noise reduction for long time exposure is activated when the function is set to On and the shutter speed is set to 1 second or slower.
Note: JPEG images are recorded at 8 bits.